.
SUMMARY
(2)
In
the last part of the summary I will show you have to paint skin. If
you paint the face and hands well this will make your figure stand
out. On the contrary if you paint a figure well but don't do a good
job on its face, it can be ruined.
Here
is the process to follow:
.
.
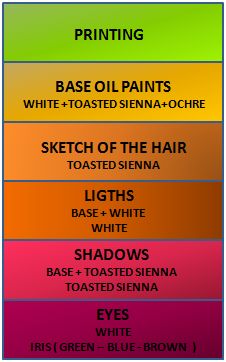
First,
as we have done before, prime the face, head and hands.
The
base colour of the face we will get with white oil paints, toasted
sienna and ochre. Depending on the time of year when we would like
to place our figure (summer of winter) we can add a ligher or darker
base. Allow the paint to dry over night.
The
next day add another layer of the base coat. From this step paint
the hair line with toasted sienna. Blend towards the centre of the
face with a 10/0 paintbrush so that the hair line looks very subtle.
We
add lights by mixing the base colour with white oil paint. Add more
white depending on the tone you want to achieve. To add the lights
add this mixture to the protruding parts of the face (cheeks, nose,
beard).
We
make shadows by adding the base colour with toasted sienna and applying
the mixture in the darkest areas of the face (the sides of the face,
the eye sockets, the ears, under the lower lip, the wrinkles that
surround the mouth). Blend the paint towards the centre, mixing a
bit with the lights you previously made, so that you can not really
tell when a light and shadow meet. Carry on adding lights and shadows
until you reach the effect that you like.
Leave
it dry for a night. Paint the whites of the eyes with white oil paint,
making sure you don't go out of the given area. Leave it to dry. Later,
carefully paint the iris in the centre (you choose the colour you
would like: blue, black, etc).
Paint
the mouth with a mixture of sienna and red.
If
we want to we can paint the cheeks with a amount of red and a amount
of grey to give the bearded look. Always blend the paint so that there
aren't any jumps in colour.
.


