Exposure
In compact digital cameras and DSRL cameras, we have 2 choices. We can set the film speed in automatic (we already mentioned why this isn't advisable) or we can choose the film speed we will use depending on the light in the scene we will be shooting. I recommend for you to choose the ISO you will use. Remember that, in the case of digital cameras, we can change the ISO in every photograph if we want to.
From this point, the shutter speed and diaphragm combination we use will determine how much light reaches the film or sensor to achieve a proper exposure.
This is the moment when we use a photometer. We can use the one found in the camera or a hand-held photometer if it is available.
If we use the camera photometer we simply point the camera towards the important aspect (or central theme) of the scene we want to photograph and we measure the light. To measure light, we need to press the shutter lightly without actually taking the picture. This is when the photometer performs its function.
The photometer will indicate the proper diaphragm and shutter speed combination we need to use for the picture to be properly exposed (Remember, there are some exceptions to this).
Let's imagine we are shooting a portrait in the park. First, we set the ISO we will use. Then, we point the camera at the person and we measure the photograph (remember there are several systems to measure photographs).
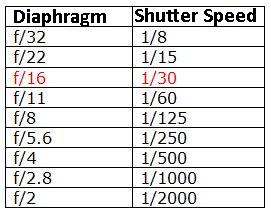
Let's imagine I'm using ISO 100 and the photometer tells me I need to use a diaphragm of f/16 at a shutter speed of 1/30 for this picture. Does this mean we HAVE TO take the picture using this combination? No, not at all. This combination is just a first parameter for you to know how much light needs to reach the camera. If the combination is not the one you want to use, you can use the combination you want.
Nevertheless, we use this combination as a staring point to create other combinations which would allow the same amount of light to reach the film or sensor. Let's imagine, as we mentioned previously, that the photometer indicated f/16 at 1/30, using ISO 100.
If I open the diaphragm 1 point (f/11), this means that the film or sensor will receive twice as much light. Thus, for the same amount of light to go into the camera, we need to increase the shutter speed 1 point (1/60) to allow half the amount of light into the camera.
So, starting from this combination, we can build several different combinations of diaphragms and shutter speeds which will allow the same amount of light into the camera.
If we shoot photographs with each one of the different combinations, all of them will be exposed in the same way. In other words, the same quantity of light will reach the film or sensor.
So, why do we need to change the diaphragm and shutter speed combination? Why do we need to do so much work? Because what will change according to the combination it uses to take the photograph is the depth of field and amount of movement in the final result. These are the two main reasons we choose one combination and not another.
For example, if we want to freeze a moving object, we can choose f/4 at 1/500. And, if we want to achieve a great depth of field, we choose f/16 at 1/30 (see the first course)

