Before Dawn
The first photograph was taken in fall, at 7.43 AM. It was a little after dawn and the sun was not yet visible. You can still see the street illuminated by artificial light.
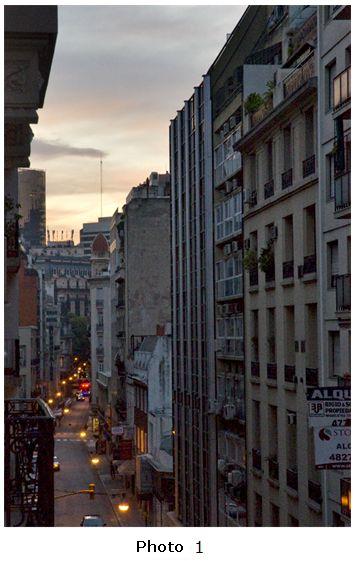
To take this photograph, I used ISO 1600 and exposed it using 1/60 at f/11. I decided to use a high sensitivity to be able to shoot the photograph using an intermediate shutter speed and a relatively closed diaphragm (to achieve some depth of field) for the photograph not to come out moved. Actually, the best thing would have been to use a tripod to be able to use a lower sensitivity and achieve a better definition.
I also chose to shoot the photograph with this combination to get a little detail on the buildings and keeping the colours in the sky.
Before dawn, when the sky begins to get illuminated by the sun, there is a lot of contrast between the sky and the earth. In other words, the sky is highly illuminated and, everything found in the ground, is not. The sky generally has warm colours (orange, yellow, and red tones) whose intensity will depend on the day. Meanwhile, on the ground, everything looks gray.
Since there is a lot of contrast, the camera can't register everything correctly. This means that if we expose the sky correctly, the ground will be dark; and if we expose the ground correctly, the sky will come out "burned" and will probably loose the characteristic colours of that point during the day.
If we look at the next 2 photographs, we can see exactly what happens when we expose the sky and when we expose the ground.
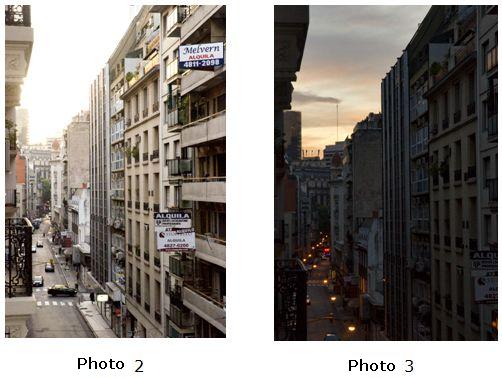
In the first photograph (photograph 2), I measured the scene pointing the camera at the buildings, and then I shot the photograph. As you can see, the scene comes out well-exposed. However, the sky is completely white; that "dawn" sense is gone.
In the second photograph (photograph 3), I measured the scene pointing the camera to the sky, and then I shot the photograph. In this example, the sky is highly defined and every colour can be seen. On the other hand, the buildings have lost their detail. I can choose either one of these pictures depending on what I want to show or the feeling I want to add to the photograph.
I can also expose an intermediate combination between the first and second photograph (see photograph 1) to get detail in both parts. Below, you can see the measurements for the 3 photographs.
photograph 2: f/5.6 at 1/60
photograph 3: f/16 at 1/60
photograph 1: f/11 at 1/60
In photograph 1, I decided to use an intermediate combination to keep the colours of dawn and get some detail on the buildings.
It is a task for the photographer deciding how to expose a photograph to achieve the desired effect. Nowadays, with digital cameras, this is a simpler task. We can take several photographs using different exposure combinations (without thinking of costs) until we reach the photograph we want.

