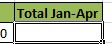
ADDING NUMERIC RANGES
Adding numeric ranges or adding several cells. We have already seen one of the ways to add with Excel by marking the cells we want to add.
In this lesson, we will see how to add numeric ranges, mainly continuous ranges.
1. We click on the cell where we want to visualize the result of adding several quantities.
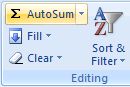
2. Look for and select the function Autosum on the toolbar under the Home tab.
3. Once you've clicked on Autosum, shade the range you wish to add.
Remember that to shade we click and keep the left button on your mouse pressed over the first cell. Then, we move the mouse to cover all the cells we want to add

In the image, you can see the data range being added; from cell C5 until cell F5
We can also see our formula bar. It shows the operation on that cell.

4. Once we have shaded our range, press Enter on the keyboard. You will get the result of this sum.
Thus, we can add the quantities under each Area, applying the previous steps.
If we also want to know how much we need to budget for the four months (considering its five areas), we can also do it.
a) Click on the cell where you want to visualize the result.

b) Look for and click on the Autosum option on the toolbar.
c) Shade the area we want to add.

Lets see the formula bar:

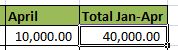
d) Press Enter on the keyboard after shading the area. We will have the total quantity.


