Types of Flash
Automatic flash
When using the flash on automatic, it will trigger the necessary amount of light to the aperture we choose. Many older model flash, and even much of the new, come with an Auto mode.
How does the flash to Auto? We have to put the ISO on the flash that we use. And then we have to put also on the flash, the diaphragm that we are using in the camera.
So when we shoot to take the picture the flash will trigger the light. This light reaches the object, reflected back to the flash. The flash has a light sensitive photocell to measure the amount of light reflected from the object.
When the photocell considers that there is enough light to properly illuminate the object, short flash. All this happens at very high speed and therefore we can not perceive.
Older models of flash only gave you 2, 3, 4 or 5 options Automatic diaphragm for each ISO. For example, I mentioned earlier Metz offers 5 options Automatic.
If I use ISO 200 I can take pictures with f / 4, f/5.6, f / 8, f/11 yf/16. If you want to use another aperture (f/2.8 of/22 for example) I have to change the sensitivity or use it to Manual.

In the photo above you can see how using the flash to Auto.
In the blue box you can see I put ISO 200.
At the top you can see that says'' means'' Automatic Automatic. And there are five short lines. These are the 5 options for a given ISO Auto.
Green 5 apertures can see that I can use with my flash when I use ISO 200. These are: f / 4, f/5.6, f / 8, f/11 and f/16.
In the red box to see how I can select 1 to use f / 4. To select the option you want I have to turn the orange arrow to match the black stripe or aperture I use.
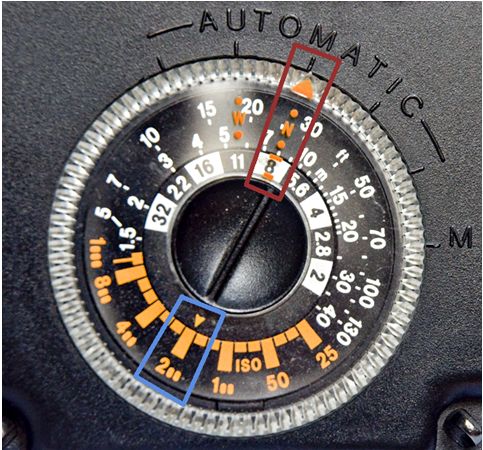
In the photo above you can see that I'm using ISO 200 (blue box) but now select option 3, or f / 8.
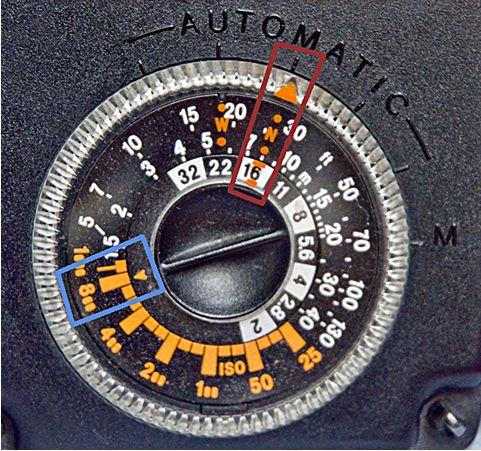
In this photo I change the ISO. Now select ISO 800 (blue box). Notice how diaphragm changed the options I can use. With ISO 800 I can use: f / 8, f/11, f/16, f/22 yf/32.
In this case I also select the third option, ie f/16 (red box).
The newest flash with Auto mode offers all the diaphragms, so there is no limitation to the choice of diaphragms.
The advantage of using the flash to Auto do not have to worry about the distance.
There will always be a minimum and maximum distance at which we can put the flash because it has a maximum and minimum. But we will always have a good range of distances to move.
The disadvantage of using the flash to Auto is that it can produce exposure errors.
When the scene, for example, too much black, little light reflected to the photocell. The photocell then did not believe that enough light to the object and does not cut the flash.
The consequence of this is that the object is too bright and out overexposed.
The opposite happens when too much white in the scene. White reflects all light (or almost all) so much light reaches the photocell.
This short flash fast when you think you have enough light. As a consequence, the object does not receive enough light and under-exposed leaves.
Another exposure error occurs when, for example we are taking pictures of a person and there are other people or objects below. The flash photocell does not know that we are taking pictures.
When we shoot the flash light will come first which is closer, the light will reflect and will reach the photocell.
The photocell will cut the flash when it considers that there is enough light. But in fact the object was further away did not receive enough light and therefore under-exposed leaves.
If we took pictures with a digital camera can see the results immediately and correct them.
But if we take film have to be careful and study and learn how our flash to compensate or correct these errors lighting.

